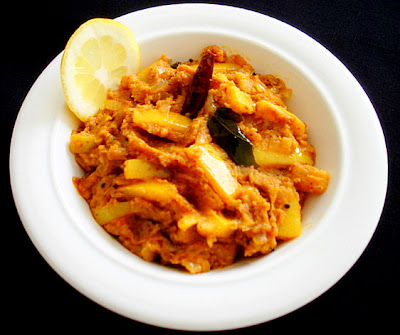
Nimbu Masala made of yellow Lemons, is my contribution to Nupur from 'One Hot Stove" blog's "A to Z Indian Vegetables" 's event.This week's letter is "N", thanks for hosting Nupur!:)
Lemons:
Nimbu means Lemons or Limes in Hindi.I am using thick skinned yellow lemons in this dish which are less bitter and has lot of pulp to make the dish substantial.Savor the spicy lemony Nimbu Masala!
The lemons are used primarily for their juice, though the pulp and rind (zest) are also used, primarily in cooking and baking.Lemon juice is about 5% acid,which gives lemons a sour taste.Lemons contain unique flavonoid compounds that have antioxidant and anti-cancer properties.In Ayurvedic medicine(India) that a cup of hot water with lemon juice in it tonifies and purifies the liver and is high in Vitamin C.More info here.
Nimbu Masala:
Do not use green Limes for this dish.Limes have thin very bitter skin which will not taste good when cooked.You must use Lemons with thick yellow skin with pulp to make delectable Nimbu masala.
I don't how many of you know about this Nimbu masala, but I love making this dish which I found in one of my old cookbooks and often serve with Parathas. It's deliciously soft and tangy and spicy,tastes divine with thick layered parathas or as a side dish with rice. I really hope you do give it try!:))
You need:
3 large Lemons,1 large onion minced,salt and 1/2 tsp sugar as optional.
To roast and grind:1 1/2 tbsp Coriander seeds,1 tsp cumin seeds,1 tsp Mustard seeds, 2 dry red chilies,4 tbsp dry coconut, and grind with 1" ginger,2 small garlic,1/2 an Jalapeno,few curry leaves.
To season: 1tbsp oil,1/2 tbsp butter,1/2 tsp mustard seeds,curry leaves,1 dry chilly,pinch of hing and 1/4 tsp turmeric.
How to make it:
Cut Lemons as shown to smaller pieces,put them all in a bowl with water,microwave for 10 mins on high.Drain all the water to take the bitterness out of the lemons.Keep aside.Roast all masala ingredients and grind with the rest as above until a smooth paste with little water.Keep aside.
Heat oil and butter,add all the seasoning first as said above.Add minced onion and fry until reddish and then add the ground masala,saute for few mins.Add in half cooked Lemons and simmer for 15mins or until sauce thick and oil shows on top.Adjust the salt and chilli pd.You could add 1/2 tsp sugar if you like but not necessary.That's it!! You can keep it in the fridge for 3 days, not more than that because of the Coconut.
Delicious Nimbu masala with Parathas:
Enjoy and have a great weekend. Watch out for some useful tips and tricks using Lemons or Limes next week!:))
April 26, 2007
April 23, 2007
PASTA PRIMAVERA
Pasta Primavera is my contribution to Meeta from 'What's for lunch honey's "Monthly Mingle" event.This month's theme is "Spring is in the air".Thanks for hosting Meeta:)
Primavera which literally means "Spring" in Italian and Spanish too(as my daughter,a Spanish student tells me!),is an "Italian American" dish that usually consists of pasta with red tomato sauce and fresh vegetables.Meat such as chicken, sausage etc can be added if you like, but the focus of primavera is the Spring vegetables themselves like Asparagus,Carrots etc.
Pasta: I used Fettuccine pasta for this dish along with lots of vegetables.Other pasta varieties you can use for this dish are Farfalle(Bow tie),Penne, Fusilli and Rotini etc. There is a funny story about this dish which is created by a Italian American in US just like Alfredo sauce and it's not really the same as real Italian dish!!Would like to read about it? Click here!
Pasta Primavera:
Serves 3-4 people.
Vegetables:
I used all kinds of veggies I could find in my fridge and freezer to make this dish.You can do the same too,there are no rules about what to use as long as they are fresh vegetables.I skipped Tomatoes since I didn't want want the sauce to be colored red and I can't see the colors of the other veggies!:)
What you need:
1 tbsp butter or Olive oil,2 clove garlic, minced,2 tsp plain flour,1 cup fat-free Half and Half,1/2 cup stock or water(if needed to thin the sauce),1/4 cup cauliflower,1/4 broccoli,1 med.Zucchini,cut into 3" sticks,1 Celery, 1 carrot, thin 4" strips (use the peeler),1/4 cup Petite peas,1 tbsp sour cream or relish,2 tbsp chopped basil or any seasoning mix you like,salt and pepper,1/4 cup grated Romano/Parmesan cheese.1/2 lb. fettuccine pasta,cooked with salt and drained.
How to make it:
Cook Pasta with salt until almost cooked,drain and keep it ready covered.Prepare the vegetables cut into strips,thaw frozen ones and microwave for 5mins just until tender not cooked completely,drain and keep aside.Heat a large non-stick pan,melt butter or Olive oil.Saute garlic,add the flour and half and half ,mix well.Simmer until thickish.
Add the sour cream,basil,salt ,pepper,taste to adjust the spices.Stir in cheese and mix well.Stir in vegetables,simmer for 2 mins and add pasta and toss everything gently.Sauce should be just coated on the pasta and vegetables.If you find the sauce to thick ,add a bit of stock to thin it.Pasta Primavera tastes better after 3omins.You can serve this warm or chilled.
Your delicious Pasta Primavera is ready!
Enjoy the dish and enjoy the Spring!!
April 20, 2007
MATKI PULAO
Delicious Matki Pulao is my entry to Nupur's "A to Z vegetables" event this week with letter " M ". Thanks Nupur:)
What's Matki or Moath beans?!
Look at the picture below.I have no idea what they call it in English. All I can tell you is, it is one of the most nutritious beans and makes one delicious spicy Maharastrian Misal I used to eat a lot in Belgaum!:))
They are these cute tiny little whole grams as you can see.You can usually get them in the dry form and when soaked overnight,they plump up to a rich brown soft beans but still the tiniest of all the beans!!:D
This recipe is from Tarla Dalal's cookbook who comes up with the most innovative tasty vegetarian dishes ever and it's nutritious as well.I did change and added a little more to the recipe. Here it is...
Matki Pulao:
You Need:
1 cup long-grain rice cooked, 1 cup sprouted matki (moath) cooked, 1/4 tsp asafoetida (hing), 1 small onion chopped fine,2 green chillies, chopped, 1 tsp cumin seeds, 1 tsp grated ginger, 4-6 spring onions, chopped, 1/4 tsp turmeric powder (haldi), 1/2 tsp chilli powder, 1 tsp coriander powder,2 small Tomatoes(Save few pieces for garnish), 1 tbsp oil, 3 cloves (powdered), salt to taste.For the garnish: Saved Tomato pieces, 2 tbsp chopped cilantro.
How to make the pulao:
Cook rice and Matki (do not overcook)separately and keep them aside.Heat the oil, add cumin seeds,onions fry until reddish.Add hing, green chillies, ginger, and spring onions,tomatoes, saute` for a few minutes.Add the turmeric powder, chilli powder,coriander powder and add 1/4 cup of water and salt.Simmer until the water is almost evaporated.
Add the cooked the matki ,clove pd,mix well and let it simmer for a while.Take it out and add this thick sauce to the rice and mix thoroughly.Adjust the salt.
Garnish with Tomato pieces and cilantro and serve with a Raita or lemon slices.
NOTE: To make this even more nutritious,you could let the Matki sprout. Soak in water for 6-8 hours,drain the water, and then tie them in a damp cloth.Put it in a dish covered and leave it overnight.They will sprout warm weather sooner than in cold.You can add Bell peppers and carrots to this Pulao to make it more colorful!
Makti beans(smaller)on your left and red Chori beans on your right!
Some of you do not know about Matki beans, so I took a photo to show you how the Matki beans look like.It's the tiny beans you see here on the left.Of course,you can use any beans to make this pulao including Moong:))
That's it.Enjoy the spicy healthy Matki Pulao:)
April 18, 2007
SAFFRON-VANILLA PUDDING
Saffron-Vanilla Pudding is my contribution for Barbara from "winos and foodies" blog's event "A taste of yellow" to participate in LIVESTRONG Day to support cancer survivors and raise awareness about cancer.LIVESTRONG Day 2007 will occur on Wednesday, May 16, if you would like to participate in your city.Thank you for letting us know about this event Barbara:)
Saffron-Vanilla pudding is also my entry for Monisha from Coconut Chutney blog's "Sugar High Friday #30-Flower Power" event.I am using Saffron as my flower for this dessert inspired by the beautiful colors and flowers of the Spring.Thanks for hosting Monisha:))
Saffron:
Saffron is a spice derived from the flower of saffron crocus (Crocus sativus).Saffron, has been always the world's most expensive spice by weight,is native to Southwest Asia.It was first cultivated in the vicinity of Greece. For more info and to look at the beautiful pictures of Saffron flower, click here.
I was more than happy to make this delicious dessert which is not only easy and beautiful to look at,you can serve in many ways as well.I chose to serve them in golden baked ready made Puff pastry shells which makes a wonderful blend of crunchy pastry with a velvety and fragrant Saffron Vanilla pudding and also as it is in a bowl for a light dessert.Hope you try!:))
Saffron-Vanilla Pudding:
Saffron-Vanilla pudding in Puff pastry shells:
You need:
A pack of 6 Puff pastry shells if you are using them to serve.For pudding: 1/4 cup sugar,2 tbsp Cornstarch,2 cups 2% or fat-free milk,1 Egg(optional),2 tsp vanilla extract,10-12 strands of Saffron and 1 tsp butter.
To make pudding:
Bake shells according to the instruction on the back of the pack and cool them on the rack.With a knife,gently remove the middle of the pastry.
To make the sauce: In a non-stick pan,mix the sugar,cornstarch and whisk the milk in.Add saffron and heat the milk.Keep stirring until thickens.Beat the egg and add a tbsp of hot milk and beat and add the egg mixture to the sauce,mix well.
Simmer until it thickens,take off the heat,add vanilla essence and butter, mix well and cool.Pour it in a bowl,cover and chill to serve as it is or if you are using the puff pastry,fill the pudding in to the middle of the shells and chill.
Note: Instead of Vanilla essence , you could add Maple syrup or essence to make Maple flavored pudding.
If you don't have the Puff pastry shells,you can cut the regular puff pastry sheet in to a 4-6" circles,bake and carefully cut a circle in the middle to make it hollow to fill the pudding.
Enjoy the delicious Saffron-Vanilla pudding!:))
April 16, 2007
SPINACH ALFREDO PIZZA!
Spinach Alfredo Pizza is my entry for Trupti from "Spice who loved me"s Spring fling 2007 event,which involves family and friends in the kitchen.There is a prize included for the best entry too,check her post!Thanks for hosting T:))
Since I don't have any extended family in US,it's usually my kids who cook for this event and may be one day,I will get my husband to cook something! When is the next full Moon day btw?!;D
Anyway,Trisha wanted to make this Pizza as it is her favorite.But she didn't feel well enough to cook after a long day being outside,so Tushar, my son took over and made it.This boy is going to take over my blogs one day! ;D
We used Pillsbury Pizza dough as a base.You could use any Pizza crust or bread dough for this.Pizza is topped delicious creamy garlicky sauce which is mixed with nutritious spinach and Romano and Parmesan cheese and baked until perfect golden! Sounds good? Let's make some.....
Spinach Alfredo Pizza:
Tushar is making Spinach Alfredo sauce:
You need:
2 Pillsbury pizza dough tubes,1 cup Frozen Spinach ,squeezed dry and chopped fine or fresh,1 tbsp butter,1 tbsp plain flour,2 cups fat free half and half or 2% milk,1 tsp Garlic pd,a pinch nutmeg(optional),salt and pepper or chili flakes,1/2 cup Kraft Romano-Parmesan cheese mix you get it in the supermarket.
How to make the Pizza:
Heat a pan,melt 1 tbsp butter,add 1 tbsp plain flour,stir until reddish.Add 2 cups fat-free Half and Half or 2% milk,1 tsp Garlic powder,pinch of Nutmeg powder.Bring up to boil and turn down the heat to medium and simmer for 5mins.Add 1 cup Spinach leaves,chopped fine,simmer until thick.Add 1/2 cup of Romano and Parmesan cheese,blend in the sauce and keep stirring until cheese melts.
Add salt,pepper/chilli flakes to taste.Take it off the heat and cool.Sauce must thick enough to spread with a spoon.Open the tubes,stretch out the dough on two baking sheets,make dimples on top with your fingertips,and spread the sauce on them evenly.Spray the edges with oil if you like to give it a color.
To bake: Preheat oven at 375F and bake both pizzas for 18-20mins or until the edges and middle are baked.Take them and cool on a rack.Slice them and serve.You can sprinkle your favorite seasoning mix on top.I like Mrs.Dash's Spicy mix and McCormick's Caribbean Jerk seasoning!
Three slices for you:
Three crust less slices for the kiddies!:D
That's it!Have a great day and enjoy the delicious Spinach Alfredo Pizza!:)
April 13, 2007
LADDUS!
Laddus made of Rava/Semolina/Cream of Wheat with coconut, is my contribution to Nupur from 'One Hot Stove" blog's "A to Z Indian Vegetables" 's event.This week's letter is "L", thanks for hosting Nupur!:)
Instead of making my own dish, this week I thought I would make this delicious Coconut Laddu recipe from Suma Gandlur at Veggie Platter for a change which tempted me to no end!;D
I usually make Rave Unde as we call them in Karnataka, classic dessert without coconut as my mom makes them.I wanted to try with coconut this time.Since I wanted make just about 10 Laddus using dry desiccated coconut,I am giving you my proportions to make these as well as Suma's recipe with fresh coconut,which I am sure tastes lot better than mine!Rest of the method of how to make them are basically same as Suma's recipe.Click on the highlighted link at the bottom of this page to go her site and for the original recipe from Suma.
Rava-Coconut Laddus:
To make about 10 small Laddus with dry coconut my way;You need:
1/2 cup roasted Semolina in 1/2 tbsp ghee,1/2 cup dry desiccated coconut ,1/3 cup or more Sugar or to your taste,3 tbsp Ghee (clarified butter),1 tbsp Almonds or Cashews,1 tbsp Raisins, 1-2 tbsp milk just enough to mix and to help to make round balls and 1/2 tsp cardamom pd.Since I used dry coconut instead of fresh,I used just enough milk to bind at end of the cooking to make Semolina rounds.If you use fresh coconut,it does have enough moisture to bind itself as Suma's recipe points out below without milk.
How I made it:
1. Roast Semolina in 1/2 tbsp ghee until pinkish and you get a good toasted aroma,spread on plate or paper towel to cool.
2. Heat 3 tbsp ghee,add nuts and raisins.When the raisins plump up,add in semolina,dry coconut,sugar,Cardamom pd and mix well until sugar melts and taste it to balance the sugar.
3. Take off the heat ,cool it slightly and add about 2 tbsp milk just enough to help you bind.Mix well and take a lump ,make balls by pressing gently to shape with your palm.(I know it's hot and you get red palm but hey! do you want to eat them or not??!!!:p)
4. Cool them before you store in air-tight dabba(box), Enjoy!:)
Here is the original recipe from Suma with fresh coconut: Check out Coconut Laddus in her site as well!:))
You need:
Rava / Semolina - 1 Cup,Sugar - 1 Cup,Coconut- 1 whole,Raisins & Cashews - 1/4 Cup,Ghee - 1 Tbsp and Powdered cardamom seeds - 1/4 tsp.
To make laddus:
Fry the rava on a low flame till it starts to give a strong aroma and turns light brown. Let it cool.Grate the fresh coconut.
Heat ghee in a small pan. Toast both raisins and cashews in the ghee till cashews turn golden brown and raisins become plump.
Now mix all ingredients and make medium sized balls /laddus out of it.
Thank you so much Suma for a delicious dessert.Have a great weekend you gals!:)
April 11, 2007
APPLE-CARROT CHUTNEY
Delicious Apple-Carrot chutney/Relish is my contribution to Mahesh from 'Beyond the Usual's "A Fruit A Month" event.This month's theme involves Apples!!Thanks Mahesh:)
Who doesn't like these gorgeous Apples?!
The disease-fighting profile of apples provides a multitude of health benefits, including a potential decreased risk of cancer and heart disease. Several recent studies suggest apples may provide a "whole-body" health benefit.A number of components in apples, most notably fiber and phytonutrients have been found in studies to lower blood cholesterol and improve bowel function, and may be associated with a reduced risk of ischemic heart disease, stroke, prostate cancer, type II diabetes and asthma.For more information,click on Washington State Apple Commission.
Apple-Carrot Chutney/Relish:
I have been making desserts for every entry to AFAM so far.I didn't feel like making another this time as well and thought I would make a sweet,hot and tangy western Chutney or relish instead.With Apples,Carrots,sweet spices and Apple cider,this relish makes a wonderful condiment served with Ham or any meat and a great spread on warm toast in the mornings!! Enjoy:)
You Need:
2 Apples any kind chopped ,1 medium size Carrot grated,3 tbsp Raisins, 1/2 cup sugar or more to your taste,1/3 cup Apple cider Vinegar,2 tbsp sweet butter,1/2 tsp salt, 2 tsp sweet Cinnamon pd, 1/2 tsp Allspice(not Garam masala)1 tsp Ginger pd,and 1/2 tsp red dry Chilli flakes.
How to make Chutney:
Prepare the Apples by chopping into small pieces and grate carrots.Heat the butter in a wide non-stick pan,add all the above ingredients to the pan and let it come to boil on a medium heat.Boil for 5 mins and turn down the heat to simmer and let it cook.
When the apples etc cook down to a thickish sauce, taste it and adjust the spices like salt,sweet and chilli as you prefer.It should sweet and tangy with apple cider than hot! When it shines on top,it's ready.It must be cooled completely before you bottle the Apple chutney.It lasts for few weeks if kept in the fridge.
Bottled up and ready to go!:)
Enjoy it on warm toast or with any meat, goes well with Ham!
April 9, 2007
KITCHEN SAFETY AND TIPS!
I am killing two birds with one stone by posting "Kitchen Safety Moments" event hosted by Jyotsna of "Curry Bazaar" and posting some kitchen tips with a recipe for "MCT-Tipology" event hosted by Sushma of "Recipe Source".
Thank you Jyotsna and Sushma for hosting these events for April!:)(Late news!J doesn't have this event in April,so if she ever does a "Kitchen Tools" theme,this would be my entry to that again!:D)
Safety tips about the knives:
Most injuries in the kitchen are caused by knives.Let me start with some precaution we must take dealing with knives we all have in the kitchen.Most of us have more than one knife in our kitchen of course as we routinely cut,chop,slice etc.It's very important first of all to keep them away from the children on a high platform on the back of the kitchen counter so kids can not reach them or pull them on to themselves.
It's better to buy one or two expensive Knives with heavy handles for balance and with steel blades which lasts a long time and also keeps sharp.It is best to have a wooden block like below to store the knives of various sizes and lengths to keep them safe and tucked away.This block also keeps the sharp edges of knives cushioned inside so they don't get dull.
A wooden block to store Knives:
A handy Knife Sharpener:
You do need to buy a grinding wheel to keep your knives sharp.Do not use any other things or way to sharpen the knives.A dull knife is more dangerous than a sharp edged knife,as a dull knife may slip as you struggle to cut with it and injure your hands and fingers.
A non-slip rubber backed chopping block or board:
Keep two separate cutting board for vegetables and meat,never cut on the same board to keep E Coli and Salmonella bacterias at bay.Always wash boards in hot soapy water,dry upright.Keep the knife's edge AWAY from you when chopping and when you are not using it.
If you have just one or two knives,store it in a drawer separately and do not reach for the top but take them out by the handle.
Use a serrated edged knife for cutting soft vegetables or fruits like Tomatoes and ripe fruits so you get a good grip on the smooth skins.Plain edges blades could slip on the skin and injure you.
Use a bread knife to slice bread or moist cakes so you don't misshapen them while slicing.Bread knives are made to slice neat and precise.NEVER put knives in the dishwasher.
Hand wash them with just some warm soapy water and wipe clean.Always use proper knives like paring knife for paring,chef's and Utility knives for chopping, bread slicer and do not use them as screw driver or can opener!Use a Potato peeler for peeling vegetable skins like Turnips,Beets and even carrots rather than knives.
This is my new toy.It's called Fresh prep "chop and mince" to mince veggies in the bowl itself,great for chopping Garlic without touching them.Another great idea is to use Kitchen scissors to chop herbs right into the dish and use scissors to cut slippery meat instead of knife.
Finally, how many knives do I have ,did you ask? More than 12 but only use 3 of those most of the time.My advice to you is don't be like me, buy only what you NEED! I also have a big meat cleaver to warn Arvind not to mess with me!! ;D
That's it from me for Knives safety in the kitchen.I am sure there are much more than these and I hope to see those at the round up of this event.Thank you J!!:)
Some kitchen tips for Sushma's Tipology along with a simple Dill Sambhar recipe!
These are the few kitchen tips I can give you about cooking dal drawn from my own experiences:
Whenever I cook any kind of dal directly in a pressure pan like Tuar dal or in a microwave like Masoor dal or Moong dal,I always add 1 tsp oil with water to prevent it from frothing and spillng all over or even blocking cooker vent which could be dangerous.Add a 1/4 tsp of turmeric too in the dal to give it a nice color and flavor.
1. I cook double the amount of dal and save half for another day to make my life easier and save some time!:D
2. If I am planning to cook the saved dal within two days I keep it in the fridge, otherwise I freeze it in a Zip lock bag.
3. Always wash the dal once and drain before you cook.If there is too much dal water after cooking,save it and use it as stock with other vegetables.
4. Adding one or two green chillies and few fresh curry leaves when pressure cooking dal gives it a nice flavor and irresistible aroma.
5. Never add salt or any tangy veggies like mangoes or Radish or sour greens with dal to cook.I have always found the dal undercooked or not soft enough to mash later.Cook them separately and then mix together.
6.Tuar dal is tougher to cook in the microwave than Masoor(red lentils) or Moong dal.
Once you add the spice powder like Rasam pd etc,do not boil the dal for a long time,it loses it's flavor.Add 1 tsp ghee to the dal after you take it off of the heat for the best flavor.
7. Dal always tastes good a day after when you let the flavor mingle for a while.
8. Last but not least,adding fresh grated or ground ginger is okay to some dals while it's cooking but not fresh garlic!I always saute Garlic in oil/butter/Tadka first before adding.I personally don't like the flavor of raw garlic in the dal, but tastes great when sauteed first!
Phew!! I thought I didn't have any tips and Sushma told me " No no Asha,you do have plenty" and she is right!:D
Dill Sambhar:
How to make Dill Sambhar/dal:
1. Cook 1 cup Tuar dal with about 3 cups of water,1/4 tsp turmeric,1 tsp oil until soft and mash until smooth.Add 1 bunch cleaned of hard stems and chopped fresh Dill leaves to the dal along with pinch of hing(Asafoetida)and keep it aside.
2. Heat 1 tbsp Canola oil,add 1/2 tsp mustard seeds,1 tsp cumin seeds,few curry leaves,1 red chili,then fry 1/2 onion minced.When reddish,add 2 minced garlic.
3. Add dal mixture,2 tsp tamarind juice,salt, 1 tomato or 1/2 cup tomato sauce and simmer.After 2 mins,add ground Sambhar masala pd and simmer for 2 more mins and take off the heat.Add 1 tsp ghee and mix.
Sambhar masala: Lightly toast 1 tbsp Coriander seeds,1/2 tsp Methi(Fenugreek)seeds, 2-3 dry red chillies,1" Dalchini(Cinnamon),2 cloves,4-6 Peppercorns and powder when cooled.
Note: No need to add Cilantro if there is any other type of greens in the dal.If it's just dal and veggies,you can add some.
Well..that's it this time around!:)
Thank you Jyotsna and Sushma for hosting these events for April!:)(Late news!J doesn't have this event in April,so if she ever does a "Kitchen Tools" theme,this would be my entry to that again!:D)
Safety tips about the knives:
Most injuries in the kitchen are caused by knives.Let me start with some precaution we must take dealing with knives we all have in the kitchen.Most of us have more than one knife in our kitchen of course as we routinely cut,chop,slice etc.It's very important first of all to keep them away from the children on a high platform on the back of the kitchen counter so kids can not reach them or pull them on to themselves.
It's better to buy one or two expensive Knives with heavy handles for balance and with steel blades which lasts a long time and also keeps sharp.It is best to have a wooden block like below to store the knives of various sizes and lengths to keep them safe and tucked away.This block also keeps the sharp edges of knives cushioned inside so they don't get dull.
A wooden block to store Knives:
A handy Knife Sharpener:
You do need to buy a grinding wheel to keep your knives sharp.Do not use any other things or way to sharpen the knives.A dull knife is more dangerous than a sharp edged knife,as a dull knife may slip as you struggle to cut with it and injure your hands and fingers.
A non-slip rubber backed chopping block or board:
Keep two separate cutting board for vegetables and meat,never cut on the same board to keep E Coli and Salmonella bacterias at bay.Always wash boards in hot soapy water,dry upright.Keep the knife's edge AWAY from you when chopping and when you are not using it.
If you have just one or two knives,store it in a drawer separately and do not reach for the top but take them out by the handle.
Use a serrated edged knife for cutting soft vegetables or fruits like Tomatoes and ripe fruits so you get a good grip on the smooth skins.Plain edges blades could slip on the skin and injure you.
Use a bread knife to slice bread or moist cakes so you don't misshapen them while slicing.Bread knives are made to slice neat and precise.NEVER put knives in the dishwasher.
Hand wash them with just some warm soapy water and wipe clean.Always use proper knives like paring knife for paring,chef's and Utility knives for chopping, bread slicer and do not use them as screw driver or can opener!Use a Potato peeler for peeling vegetable skins like Turnips,Beets and even carrots rather than knives.
This is my new toy.It's called Fresh prep "chop and mince" to mince veggies in the bowl itself,great for chopping Garlic without touching them.Another great idea is to use Kitchen scissors to chop herbs right into the dish and use scissors to cut slippery meat instead of knife.
Finally, how many knives do I have ,did you ask? More than 12 but only use 3 of those most of the time.My advice to you is don't be like me, buy only what you NEED! I also have a big meat cleaver to warn Arvind not to mess with me!! ;D
That's it from me for Knives safety in the kitchen.I am sure there are much more than these and I hope to see those at the round up of this event.Thank you J!!:)
Some kitchen tips for Sushma's Tipology along with a simple Dill Sambhar recipe!
These are the few kitchen tips I can give you about cooking dal drawn from my own experiences:
Whenever I cook any kind of dal directly in a pressure pan like Tuar dal or in a microwave like Masoor dal or Moong dal,I always add 1 tsp oil with water to prevent it from frothing and spillng all over or even blocking cooker vent which could be dangerous.Add a 1/4 tsp of turmeric too in the dal to give it a nice color and flavor.
1. I cook double the amount of dal and save half for another day to make my life easier and save some time!:D
2. If I am planning to cook the saved dal within two days I keep it in the fridge, otherwise I freeze it in a Zip lock bag.
3. Always wash the dal once and drain before you cook.If there is too much dal water after cooking,save it and use it as stock with other vegetables.
4. Adding one or two green chillies and few fresh curry leaves when pressure cooking dal gives it a nice flavor and irresistible aroma.
5. Never add salt or any tangy veggies like mangoes or Radish or sour greens with dal to cook.I have always found the dal undercooked or not soft enough to mash later.Cook them separately and then mix together.
6.Tuar dal is tougher to cook in the microwave than Masoor(red lentils) or Moong dal.
Once you add the spice powder like Rasam pd etc,do not boil the dal for a long time,it loses it's flavor.Add 1 tsp ghee to the dal after you take it off of the heat for the best flavor.
7. Dal always tastes good a day after when you let the flavor mingle for a while.
8. Last but not least,adding fresh grated or ground ginger is okay to some dals while it's cooking but not fresh garlic!I always saute Garlic in oil/butter/Tadka first before adding.I personally don't like the flavor of raw garlic in the dal, but tastes great when sauteed first!
Phew!! I thought I didn't have any tips and Sushma told me " No no Asha,you do have plenty" and she is right!:D
Dill Sambhar:
How to make Dill Sambhar/dal:
1. Cook 1 cup Tuar dal with about 3 cups of water,1/4 tsp turmeric,1 tsp oil until soft and mash until smooth.Add 1 bunch cleaned of hard stems and chopped fresh Dill leaves to the dal along with pinch of hing(Asafoetida)and keep it aside.
2. Heat 1 tbsp Canola oil,add 1/2 tsp mustard seeds,1 tsp cumin seeds,few curry leaves,1 red chili,then fry 1/2 onion minced.When reddish,add 2 minced garlic.
3. Add dal mixture,2 tsp tamarind juice,salt, 1 tomato or 1/2 cup tomato sauce and simmer.After 2 mins,add ground Sambhar masala pd and simmer for 2 more mins and take off the heat.Add 1 tsp ghee and mix.
Sambhar masala: Lightly toast 1 tbsp Coriander seeds,1/2 tsp Methi(Fenugreek)seeds, 2-3 dry red chillies,1" Dalchini(Cinnamon),2 cloves,4-6 Peppercorns and powder when cooled.
Note: No need to add Cilantro if there is any other type of greens in the dal.If it's just dal and veggies,you can add some.
Well..that's it this time around!:)