Showing posts with label Bread. Show all posts

April 13, 2009

Spring Onion, Bacon and Cheddar Bread, Kasutera-Japanese Honey Cake

Spring onion, Bacon and Cheddar bread, goes to Cindystar who is guest hosting "Bread baking Day #19-Spring Country bread", an event started by Zorra.

Kasutera, a Japanese Honey cake,
goes to Lavanya's "A.W.E.D.-Japan", an event started by DK.

Thanks to all of you ladies, enjoy hosting.

Cheesy Scallion Bacon bread, a savory loaf makes an excellent addition to any picnic or get together at home. Sliced and toasted bread is great for breakfast or to serve as colorful appetizers like finger food topped with Tapenade or cream cheese. With green onions, Bacon, Cheddar and chilli flakes added, it gives little zest to the bread and makes it festive as well.

Vegetarians can skip the Bacon and bake it with Spring onion, grated carrots, Bell peppers etc along with any cheese you like.
Just make sure that veggies you use don't get watery when baked, roast the veggies before adding.

Spring Onion, Bacon and Cheddar Cheese bread, ready for picnic, got a basket?!

This recipe adapted by 'Totally Teabreads" by Albright and Weiner. Hope you try it!

You need:

Large loaf pan 9" by 5" by 3", brushed with butter or sprayed with no-stick oil inside.

Preheat the oven to 350F.

To saute:
1/2 cup Butter, 1 cup Green onion/Scallions, finely chopped including tender green and white parts. 4-5 Bacon finely chopped or you can use 3 tbsp bottled real Bacon bits.
Dry ingredients:
2 3/4 cup Plain flour, 1 tbsp sugar, 2 tsp Baking powder, 1/2 tsp Baking soda, 3/4 tsp salt, 1/8 tsp of Pepper or red chilli flakes, 1 tsp Garlic powder, 1/4 tsp mixed herbs, mix all these first. Then add 1 cup grated Cheddar cheese and stir in to mix.
Liquid ingredients:
1 cup Buttermilk, 1/2 cup water, 2 large eggs. Beat these two and keep aside.
To top:
1 tbsp Bacon bits to sprinkle on top of the batter.

To bake:
1. Add butter to the pan, heat and add green onions and Bacon, saute until just soft for 2-3 mins. Take off the heat.
2. Mix all the dry ingredients, add butter-onion-Bacon to this, mix well. Add liquid ingredients, mix well again until you don't see any white flour. You can use the lowest speed beater to mix in the stand mixer as well.

3. Scrape the thick batter to the loaf pan, tap it gently to release the air and sprinkle 1 tbsp reserved bacon bits on top of the batter. Put it in the oven.
4. Bake for 50 to 60 mins or until the cake tester inserted in the middle comes out clean. Take out of the oven, let it cool in the pan for 6-7 mins and then invert it on the rack to cool.
4. Slice and serve warm or toasted with butter or on the side with soup or pack the slices for picnic! Enjoy! :)

*************************************************************************************************************************
Kasutera:
Kasutera is a spongy, eggy Japanese Honey cake which is not very sweet or naturally sweet with honey, hence do not need icing. Without adding any kind of essence, it has a wonderful aroma of honey and with just a dusting of confectioner's sugar on top, not too sweet either which is how I like my desserts!
This recipe is adapted from a 'Learn to cook' book series called "Japanese Homestyle Dishes". Usually, I don't cook any Japanese food at home or interested in trying either. I ran...well...drove to the library, borrowed this book. Kasutera sounded and looked good, so glad I tried it! I read that it's a popular dessert cake in Nagasaki, Japan, originally brought to Japan by Portuguese.

You Need:
5 large Eggs, 2/3rd cup Powdered sugar, 1/4 cup Honey, 1 tsp Baking powder, 1 cup All purpose flour or Cake flour. (9" by 9" cake pan, lined with parchment paper and sprayed with no-stick oil or butter.
(You can add 1 tsp of essence of your choice like Orange or Lemon, but recipe didn't say and I didn't add any either, loved the natural honey taste and aroma!)

For dusting: 1/4 cup extra powdered sugar for dusting the cake on top. You can even dust it with cocoa powder for contrast.

To bake the cake:

Preheat the oven at 350F.

1. In a mixer with whisk attachment, add 5 Eggs and beat until frothy.
2. Add in the Honey and powdered sugar, beat this mix for 10 to 12 mins, until it's thick, pale in color and beater leaves a ribbon when lifted.

(This 2nd step is very important to keep the cake fluffy and bake high, so do beat well until you see the trail of ribbon with the batter before adding the flour etc)

3. Now, add the baking powder and flour gradually, mix and fold or beat on low speed gently just until flour is well incorporated.
4. Pour into prepared pan and bake for 25 to 30 mins or until skewer when tested in the center of the cake comes out clean. Don't bake too much.
5. Invert on a cooler, peel off the parchment paper.
6. When completely cooled, dust the top with powdered sugar and cut into slices to serve.

Enjoy and see you all later! :)

February 27, 2009

Jamaican Festival (Fried Bread)

My Jamaican festival bread goes to Meeta of "What's for lunch, honey" blog for her "Monthly Mingle" event. She has chosen "Caribbean cooking" as a theme for this month. Thanks for hosting, Meeta! :)

(A quick note to all event hosts before I start:
I will be taking a short break from cooking for events at "Aroma" blog probably until the last week of March or so, really need some time to read few books! My weekly blog posts at "Foodie's Hope" will go on as usual every Wednesday over there!)

Caribbean:

"The Caribbean region is mainly a chain of islands surrounding the Caribbean Sea.All islands at some point were, and a few still are, colonies of European nations; a few are overseas or dependent territories. The geography and climate in the Caribbean region varies from one place to another. Some islands in the region have relatively flat terrain of non-volcanic origin. Such islands include Aruba (possessing only minor volcanic features), Barbados, Bonaire, the Cayman Islands or Antigua. Others possess rugged towering mountain-ranges like the islands of Cuba, Dominica, Hispaniola, Jamaica, Montserrat, Puerto Rico, Saba, Saint Kitts, Saint Lucia, Grenada, Saint Vincent, Guadeloupe, and Trinidad & Tobago. The region sits in the line of several major shipping routes with the man-made Panama Canal connecting the western Caribbean Sea with the Pacific Ocean." Info from WIKIPEDIA.

Jamaica:
"Jamaica is the third largest Caribbean island. It's indigenous Arawakan-speaking Taíno inhabitants named the island Xaymaca, meaning the "Land of Wood and Water", or the "Land of Springs". Formerly a Spanish possession known as Santiago, it later became the British Crown colony of Jamaica and later became independent in 1962. It is the third most populous anglophone country in North America, after the United States and Canada. It remains a Commonwealth realm. Its traditions of reggae, rastafarianism and Jamaican art mingle with cosmopolitan culture makes Jamaica an attractive destination for tourists. The natural beauty of the island also offers many amazing rivers, waterfalls, rain forests, coral reefs and sandy white beaches!"

I chose to make Jamaican festival, which are fried bread, either can be less sugary bread served with Fried Fish, Jamaican Jerk Chicken and rice and peas or sweet Festival bread as dessert. I found this recipe in one of the Jamaican travel websites. They are delicious as dessert sprinkled with powdered sugar, don't retain much oil even though they are deep fried. Hope you try!

Jamaican Festival:
Festival are oval shaped, somewhat thin, slightly sweet, crispy flour and cornmeal fritters. Why do they do call it Festival? May be because eating them is like having a festival in your mouth, as one of the theories go! :D

You need:
1 1/2 cups plain flour,
3 tbsp cornmeal,
about 1 cup of water,(you may need less, do not add all at once),
1/2 tsp salt,
3 tbsp sugar, less for savory festival and more if you like them very sweet,
1 tsp baking powder
1 tsp vanilla essence.

How to make them:
1. Sift the plain flour in to a bowl and stir in the cornmeal, salt, sugar and baking powder.
2. Add Vanilla and mix. Add water tbsps at first and then as much as you need to get a very firm dough like Poori dough. Do not make them sticky and soft dough. You can add more flour if it becomes sticky which could make the bread hard, so do try not to add too much water to the dough to begin with.
3. Cover the dough and let it rest for 15-20mins. Divide into 8 or 10 pieces and without handling the dough too much, make shapes like elongated ovals or as you see in the photo, keep them aside.
4. Heat oil to 365F and deep fry the Festivals until golden, drain on the paper towel.
5. After they are cooled, sprinkle powdered sugar on top to serve or just plain with Jerk Chicken or fried Fish.

That's it! Beautiful Festivals are ready to eat. Have fun eating them! :)

February 23, 2009

Sour Cream Potato Loaf and a Tomato Garlic soup


Sour cream and Potato bread
is my contribution to "Bread Baking Day #17" event which is started by Zorra of "kochtopf". For the month of February, Lien of "notitievanlien" blog is guest hosting this event, with her choice of "Bread and Potato" for us.
Thanks to both of you, enjoy hosting and I can't wait to see the round up and salivate at all the Potato filled Breads!! :)


Bread made with tangy Sour cream, Potato flakes and spices like garlic etc makes this loaf a delectable snack to have any time of the day. It's texture is very soft inside and bit crusty outside since we add a bit a baking soda along with yeast. It bakes to a gorgeous golden color speckled with herbs and spices, toasted thick cut slices are delicious to eat. Tastes better the next day, keep it wrapped in a gallon size Zip-lock bag.
You can use wheat flour and Oat flour to replace Potato to make it healthier and skip the spices to make it plain. Add 1-2 tbsp more sugar to make it a sweet bread. Choices are unlimited when you use the basic recipe and get creative! :))

Sour Cream and Potato spiced up loaf:

A super delicious slice for you, I can't tell you how aromatic this bread is!!

Here are the ingredients:
1/2 cup Sour cream,
1/2 cup Water (warm 80F)

3 tsp dry active Yeast to add to warm water and sour cream mix.

1/2 cup dry plain Potato flakes, (Flavored potato flakes has salt etc, will make the bread salty)
1/3 cup Milk (warm).

1 tbsp sugar,
1/4 cup softened butter,
3 cups white or wheat Bread four,
1 tsp Salt,
1/2 tsp Baking soda,
1/2 tsp garlic powder,
1 tsp dry Parsley,
1 tsp Chicago Steak seasoning for grilling, (you see in the collage which has mixture of dry onion flakes, red chilli pepper, pepper, crushed coriander and cumin seeds, mixed herbs etc. or you can use any spice mix you like)

To bake:
1. Mix sour cream and water well, heat for 40seconds in the microwave. When it's warm, add yeast and set aside for 5 mins to get foam or bubbles on top.
2. Add 1/3 cup warm milk to dry potato, mix well.
3. Add all the dry ingredients to a mixer with flat beater attachment, mix well. Add in the yeast mix and potato+milk mix and beat well.
4. Change to kneader attachment, knead this dough for 4 mins until you get soft and non-sticky dough. If the dough is too dry, add a tbsp of water at a time until you get the soft dough but do not make the dough sticky.
5. Take out the dough, put it in a non-stick loaf pan, cover and let it proof in a warm place until double, no second rising is needed.
6. Pre heat the oven to 375F. Uncover the dough, slice 1/2" deep gash on the top of the loaf and sprinkle some spice mix on top if you like.
7. Bake in the middle rack for 25 to 35 mins depending on your oven or bread is golden and sounds hollow when tapped.
8. Cool on a rack and slice when cooled.

Serve this toasted thick slice for breakfast with butter or on the side with any soup. Also makes an excellent snack with cream cheese!
You can also divide this dough into 12-16 rolls instead of one big loaf to make smaller dinner rolls as well.
Enjoy! :)

***************************************************************************************************************************************

Neha of "Tasty recipes' Blog is guest hosting "SWC-Soups" event this month. SWC event is started by Lakshmi of "Taste of Mysore" blog. Neha has chosen "healthy soups with fresh vegetables" as a theme. Thanks to both of you. Here is my healthy and tasty Tomato Garlic soup with a Sour cream-Potato slice to dip! :))

Tomato-Garlic-Basil soup:

To make the soup:

1. Heat 2 tsp olive oil in a deep pan, add 3 finely chopped garlic, saute for few seconds. Now 2 tsp plain flour and mix well and cook until it becomes golden in color to make a Roux. Add 1 or 1 1/2 cups of vegetable stock, whisk well.
2. Add 3-4 cups chopped fresh Tomatoes (cut and squeeze out the seeds to avoid tanginess), 2 slices of onion, 1 tbsp or more sugar, enough salt and pepper to taste, boil it until they are all soft and cooked.
3. Let the soup cool a bit, then put the whole thing in a blender. When you get a smooth soup, pour it thru' a strainer to get all the tomato skins and any solid parts left.
4. Put it back on the stove, heat it thru' or you can use the Microwave too. When done, add 1 tbsp finely chopped fresh Basil (or Thyme or Oregano) on top and a 1 tbsp fat free heavy cream or 1 tsp of Parmesan cheese or both! Garnish with a sprig of fresh Parsley.

Note: You can use 1 cup of canned Tomato sauce to replace the fresh Tomatoes if you like.

Serve the Tomato Garlic soup drizzled with fat free cream and Croutons or slice of toasted Sour cream and garlic bread I have posted above. Enjoy! :)

January 9, 2009

Spinach and Feta cheese bread

Spinach and Feta cheese bread is my contribution to "Bread Baking day #16" which is being hosted by Temperance of "High on the Hog" blog, with a theme of Bread with cheese. Thanks for hosting the first bread event for 2009, Temperance and my thanks to Zorra for starting this event. I am sure you all will enjoy this event as much as I did baking this bread! :))

When my kitchen was being remodeled last December, I couldn't cook at all for 5 weeks and that is the first time I just sat idle not being able to cook at all in 22 yrs after I got married! Did I enjoy the freedom? Not at all!! I just missed the cooking, baking and the aromas so much. When the construction was done, first thing I wanted to do is to bake a good bread in my brand new convection oven. I went on searching for a good bread recipe and I found this spinach-Feta bread recipe in a website which reminded me of Greek Spanakopita. Spinach, Rye and Feta sounded perfect for me and here it is, my first bread baked in my brand new kitchen and oven! What a perfect bread baking with cheese event to show it off too! :)

I tried this wonderful bread recipe from this beautiful cooking bread classes site. Check this out for step by step pictures. I have typed the bread recipe for my future reference here. My sincere thanks to this wonderful site for educating us all with such a clear cut instructions and for this super Spinach healthy and wonderful tasty, slightly tangy Feta bread.

Spinach-Feta cheese bread:
I followed the recipe mostly as it is except few changes and I also used the frozen Spinach instead of fresh Spinach. I didn't have the fresh greens at hand at the time but I don't think it took away much in the taste. Do use fresh Spinach if you can.

Spinach and Feta Bread 1

You need to do this the night before baking; Mix all these, cover and let it ferment overnight:
3/4 cup bread flour,
1/2 cup lukewarm water,
1/4 teaspoon instant yeast.

Next morning, gather all these in one place before you start the dough:
2 cups chopped fresh spinach or frozen, thawed and squeezed dry spinach,
1 tsp or butter to saute the Spinach,
Pinch of salt.

1 1/4 cup lukewarm water,
1/2 cup dark rye,
1 1/4 cup whole wheat flour,
1/2 tsp instant yeast,
1 tsp salt,
1/2 tsp crushed pepper or dry chilli flakes,
2 cups bread flour,1 cup crumbled feta cheese.

First step:
Heat 1 tsp oil or butter in a pan, add salt, Spinach and saute until wilted and there is no liquid left. I microwaved the thawed spinach until the water evaporated, checking it often taking care not to burn the greens. Take it out, separate the clumps if any and let it cool.
Now:
1. Take a big bowl (or if you are using the KitchenAid to knead like I did, use that bowl),add "night before" fermented mix and lukewarm water, mix gently.
2. Add salt, pepper or chilli flakes, yeast, and both Rye and whole wheat flour, mix again. Leave it for 5-10 mins to rise a bit.
3. Add the bread flour, 1/2 cup at a time until you use all the flour until you get a very slightly sticky dough. You might need more or less bread flour than 2 cups, use your judgment. Knead well by hand or in the machine until you get a good smooth dough. Cover and let it rest for 5 mins.
4. Now, add spinach and Feta cheese on the dough, fold and knead gently until evenly mixed with the dough. In the machine, add spinach first, let it mix gently on low speed. Once well mixed, add Feta and mix on the lowest speed just until mixed.
5. Brush some oil on the dough, cover and let it rise and double in a warm place or warm oven for about 2hrs. Divide into two and make round dough. Place on the baking sheet, brush some flour on the top. Cover with a towel and let them rise again for an hour.

Finally!!
Preheat the oven at 400F (Yes, I used 25F less than what the recipe says).
Once the oven is heated, uncover the dough and place the sheet inside. Since mine is a brand new Convection oven, I didn't use the water as it says at the cooking bread site but do follow that method if you like. Bake these bread loaves for 30-40mins or until they sound hollow when tapped at the bottom of the bread.
Again, use your judgment according to your own oven, times and temperature may vary. Do not overbake. I also used a double layered insulated cookie sheet to bake these bread, which doesn't give you a very dark bottom. You could use Pizza stone to bake the loaves and you could place a pan with water on the bottom rack for steam while baking. It's up to you.

Sliced!
I gave the second loaf to my neighbor who is a breast cancer survivor. She was so happy to receive such a healthy and tasty bread. However, as soon as she saw the bread, she was excited thinking that I brought her a Indian style bread but was equally happy to know that it had Greek ingredients instead! :D

Slice 1

So, that's it for today. Hope you have a wonderful weekend. We are looking forward to see the movie "Gran Torino"tomorrow! :))

June 23, 2008

Parading Injera, Griddle Omelet and cheesy Hash with Wasabi Mayonnaise!


Susan of "The well-seasoned cook"
is hosting a "Pancakes Parade" event this time. Pancakes? We do have thousands of those in India, don't we? I thought why not try a new pancake I have not tried before. So here it is, a Ethiopian Injera with two side dishes and salad! Enjoy Susan, thanks for hosting!:)


A little note:
This is my last post at "Aroma" blog for events this month until the end of August. I will miss cooking for your events but it's time to take a break and rest a bit!
I still have 3 more posts ready to go at my "Foodie's Hope" blog until July 9th. After I post them there, I will be taking a vacation in the cooler Smoky mountain and a long Summer blog break. If you need any recipes from this blog, please type the words in the search engine you see on the sidebar or go to my Recipe Index to search by category or ask me, I will still be moderating the comments here anyway. Enjoy these for now! :)

About Teff:
Teff is staple grain of Ethiopian cuisine and the smallest grain in the world. It takes about 150 teff seeds to equal the weight of a kernel of wheat, so you can imagine how samll! Teff grain is very high in fiber, iron and calcium. It has a sweetish nutty flavor, is completely gluten free ( just like rice flour we use for Neer dosa,) , so you have to mix Teff flour with other flour to make Injera to prevent it breaking into pieces. Teff comes in different colors ie reddish, brown and very creamy color. Injera is eaten with spicy meat (Doro wat+chicken stew) and vegetable Wat (stews) placed on huge Injera on the plate and eaten by hand, tearing and scooping the stews and with a Salata (salad)! Of course they have coffee, homemade Beer called Tela and Tej is a homemade Wine! Ethiopians make many spicy sides dishes, place on the Injera itself and eat them by hand tearing a piece of Injera and scooping the side dishes with it, just like we Indians do! Desserts are not usually served with every meal.

Ethiopian Injera, Yegomen Wat, Yataklete Klikil and a Salata!
Yegomen wat is a side dish with spiced greens like Collard, Kale etc, Yataklete Kilkil is mixed vegetable stew (I used just beets) and a salata/salad of Cucumber, lemon juice, green onion, cilantro and salt. Injera can be made as big as 10-12" in diameter!
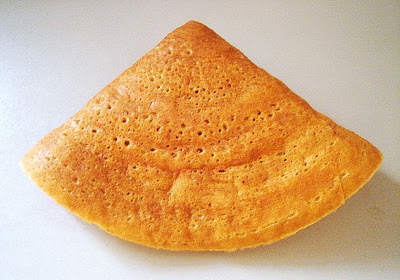
Injera, a Ethiopian pancake like dosa, is the national bread of Ethiopia and these can be made in various ways. Just mix Teff flour with water and salt, pour like neer(rice flour) dosa or mix with wheat or plain flour to make pancakes or ferment the batter overnight or longer up to 3 days to make very sour pancakes too. I chose to ferment Teff+wheat flour (atta) batter for just 1 day like we ferment to make our own rice and Urad dosa we south Indians are famous for! :D

How to make Injera:


This is how I made Injera:

1. Mix 1 cup Teff flour, 2 cups slightly warm water, pinch of sugar, 2 tbsp yogurt or 1 tsp yeast, ferment overnight to make them next day.
2. Next morning, add little salt, 1/2 cup plain flour or wheat flour, mix well. Make the batter thin enough to spread itself on the tawa, leave it for 1 hr. A pinch of soda can be added before making Injera.
3. Heat a non-stick Tawa on medium high heat, spread the batter as big as you can, cover with a lid. You cook only on one side as you do Neer dosa but if you can manage flip once.
4. When cooked take it out on a plate, repeat with others.
5. Serve with side dishes, salad and coffee.


Two side dishes:

To make Yegomen wat:
1. Heat 1 tbsp oil, add 3 chopped garlic, 1/2" grated ginger, few red chilly flakes or few green chillies, saute for a minute.
2. Add 1 chopped onion, saute until soft. Add in 6 cups of cleaned and chopped Greens like collard, kale or Spinach. I used homegrown red chard, pinch of salt and pepper, 1/4 cup water and cook until soft with very little gravy. You can sprinkle 1/8 tsp of Cardamom pd or Nutmeg pd. Adjust the spices and serve.

To make Yataklete Kilkil:
1. You need 4 cups of mixed vegetables. I used just Beets, peeled and cubed.
2. You cook the same way as above but you can add spicy Berbere spice mix if you like this to be different from Greens. It's a mix of various spices similar Indian curry masala.
3. You can also use Niter Kebbeh/spiced butter to season instead of just oil, gives it a great aroma and taste.


Perfect Ethiopian Injera/African Dosa! :D


Enjoy, we certainly did!:)

********************************************************************************************************************


KayKat from "Cooking from A to Z"
blog is guest hosting "Think spice..Think..." event this month with her of spice "Wasabi"! Ooh, scary spice isn't it? ;D
This event's creator is Sunita of "Sunita's World". My contribution to this event is "Wasabi Mayonnaise on griddle Omelet and cheesy Hash". Enjoy and my thanks to KayKat and Sunita!:))


Wasabi:
Wasabi is used in mostly Japanese cuisine like Sushi, Sashimi etc. The real Wasabi is a root which is to be grated or ground to use. Poor little people like me use the generic Wasabi which comes in little tubes and boxes like this you see below. Click on the Wasabi title link to learn more.
My first experience of eating Wasabi was at a restaurant, not Japanese but in a Italian one. It came as big coin sized green blob on the side of the plate with appetizers. I thought it was some fancy green Mayo and scooped 1/4 tsp and put in my mouth. Next thing I know I was literally seeing stars, my brain started tingling, felt like needles all over my skin and I thought I was going to drop dead right there. It was nothing like I have experience before, specially when your's truly loves her Jalapeño chutney with ghee and Ragi rotti people!! I ran to the rest room to wash of me off ASAP! :D
Well... they had served me the pure kind of root Wasabi. Hurray for them!! I am going to give you a milder and American style Wasabi Mayonnaise, so you can relax. My kids ate this Wasabi Mayo with Omelet and Hash, that says something, ain't it? ;D

Not so authentic Wasabi/greenish Horse Radish powder in a box!!

To make Wasabi Mayonnaise:
Mix 1 tbsp of powdered Wasabi, 5 tbsp regular good quality Mayonnaise from the store, 1 tsp Lemon juice, pinch of salt, 1 tsp honey or sugar (optional), 1 tsp water only if needed and if it's too thick to pour or drizzle on these. Whisk all these and pour into a plastic bottle with spout. Best chilled in the fridge or keep at room temp if using quickly but not for too long, got Mayo in there, remember?

Omelet and Cheesy Hash drizzled with Wasabi Mayonnaise:
This recipe serves two. I have already posted these combo before here. These are similar but simpler way of making these. Once done, plate them and drizzle the Wasabi Mayo on top and serve immediately. Tastes wonderful, enjoy!:)

Make Hash:
Hash takes longer to cook, so start that first. Hash is nothing but grated Potato, cooked with spices and vegs until crisp, a southern US classic.
Coarsely grate 2 medium peeled potatoes. Heat some oil or butter in a non-stick skillet, spread the grated Hash thinly, sprinkle salt, let it get reddish brown on the bottom. Gently flip.
Add any spices and herbs. When done, sprinkle cheese on top, cut into half and take them out on a plate.
Omelet:
Make Omelet with 3 eggs, add salt, spices of your choice on a griddle or a non-stick pan. Push the eggs to the center while it's cooking to make the Omelet thick and fluffy. Cover let it cook on gentle heat, sprinkle cheese on it and take out on a plate. Drizzle Wasabi Mayo and serve with Hash on the side!!

Have a wonderful fun filled Summer, will see you at the end of August or September here again at Aroma!

June 20, 2008

Mango-Cream JELL-O, Mint-Coconut-Peanuts Chutney

I am bringing a sweet and super easy dessert "Mango-Cream JELL-O" for Meeta from "What's for lunch honey" blog's "Monthly Mingle" with the theme of " Mango Mania " this month. I thought I wouldn't be able to make anything for MM this month since I am getting ready for a Summer blog break but squeezed in one more post anyway. Who can resist Mangoes! Hope you like it Meeta, great choice of fruit!:)

Mangoes:
Mangoes have been cultivated in India and South East Asia for thousands of years, also cultivated in many tropical regions and distributed widely in the world. Mango is one of the most popular and well loved fruit. Raw or ripe Mangoes can be in various sweet and spicy dishes and Mango leaves are used for religious ceremonies, during Hindu festivals and weddings in India.. For a great collection of unique Mango dishes, click here!

Mango-Cream JELL-O:
I have made so many Mangoes dishes before in my blog as you see in my list below, I thought I will keep it very simple this time. This cool dessert was delicious and so easy to make. It's specially great for kids. Hope you make it!:)

You need these:
1 3/4 Cup Mango pulp (I used Kesar canned Mango pulp),
1/2 cup Cream half and Half or Heavy whipping Cream, divided into half, (heat 1/4 cup cream to dissolve Gelatin)
2 Envelopes(1/4oz each) of Knox or Jell-O Original unflavored unsweetened Gelatin,
1-2 tbsp powdered sugar, if mango pulp is not sweet enough, up to you.
1 tbsp crushed Pistachios and Some Whipped cream to garnish.(optional)
To make it:
1. Add Mango pulp, half of the cream and powdered sugar, mix until creamy.
2. Heat 1/4 cup of milk or cream, add gelatin and let it dissolve. Then add this mixture to Mango to whisk well.
3. Pour in any shaped molds and chill in the fridge for 3 hrs.
4 Serve chilled, sprinkled with some crushed Pistachios or with more cream on top if you like. Enjoy!:)

Note: Add 1 Gelatin envelope to 1 1/4 cup or less liquid, total proportion to get a good Jello texture. You can also add Gelatin to cold Mango mix but have to whisk (or mix in blender) hard to dissolve Gelatin and adding Gelatin to warm cream first to dissolve it, makes it easier set the Jello! :)

Check out these dishes!
Jaggary Jello!
Mango Cobbler,
Mango Dal,
Mango Lassi,
Mango-Coconut Pound cake.
Mango-Coconut Burfi.
Mango Kheer.
Mango Ice cream!

Have fun cooking with Mangoes!:)

******************************************************************************************************************
Dee from "Ammalu's kitchen" has started a new event celebrating various herbs called "Herb Mania" this month. She has chosen "Mint" as her choice to start with. Here is my simple Mint, Coconut, Peanuts chutney from me Dee, enjoy hosting your event!:)


Homegrown Mint from my backyard:
Mint grows uncontrollably in a moist, well drained soil if you don't contain it in the pots. I always plant the good quality mint in a large pot rather than the in the ground. They thrive in the sunshine, but need to bring in the house for Winter, although they are very easy to grow every Summer. These Mints are called Peppermint, has good mild flavor to cook but it doesn't exactly smell like Pepper or like toothpaste like Spearmints do!:D

Mint:
Dried mint leaves were found in Egyptian pyramids, dating from 1000 BC. The plant is thought to be indigenous to Europe, northern Africa, and western Asia and it was introduced into America, Australia later.
Peppermint and Spearmint are the two best known of the mints but there are literally hundreds of varieties of mint. Mint is not only used in cooking and in drinks (Mojitos!), it also doubles as medicine to clear Sinuses, relieves Colic, added to bath water to soothe the muscles and in Tea with Honey. Mint flavor is added in Tooth pastes and in Medicinal syrups to make it pleasant to take too.

Green Moong Idlis with Mint, Coconut, Peanut chutney:
These delicious light green and super soft green Moong Idlis are from Sushma's "CookSpot" blog. I made these last week to link at FH and made some spicy Mint chutney to go with it. Thanks for these Idlis Sushma, they were excellent and so nutritious too!:)

For chutney, you need:
1 large bunch or 2 cups loosely packed of Cilantro,
1 cup loosely packed Mint leaves,(Spearmint, I find it too strong, use less),
1/4 cup fresh Coconut,
1/4 cup roasted Peanuts,
2-4 Green chillies,
Few curry leaves,
1"fresh ginger,
1 tsp Tamarind juice or you can use 2 tsp Lemon juice too,
Salt.
To season:
1 tbsp oil, 1 tsp Mustard seeds, 1 tsp Urad dal, few curry leaves.
To make it:
1. Roast Peanuts in the Microwave for 30 seconds on a plate, let them cool.
2. Add the cooled peanuts to coconut etc and grind all them in a blender until smooth.
3. Heat a pan, add the seasoning ingredients and when they splutter, add to chutney and mix.

Note: Mint tends to discolor when exposed to air which turns it to blackish color. Although taste doesn't change, it will look darker.To avoid this, you have to more lemon juice to chutney.
You can also wilt the cilantro, curry leaves and mint for a second in a hot pan, roast green chillies before grinding but not necessary.

Have a great weekend. I have one last post to go here at Aroma and 2 more posts/weeks at FH before I take a blog break. See you all next week!:)

June 9, 2008

Ridge Gourd Kootu, Chicken Masala with fresh Turmeric rice

Ridge Gourd Kootu goes to Sig of "Live to Eat" blog , who is guest hosting JFI event this month. Sig has chosen a tangy fruit "Tamarind" as her choice for JFI, widely used in dishes everyday in most south Indian dishes. JFI event is created by Indira of Mahanandi. Thanks for choosing Tamarind Sig!:)

Tamarind:
Tamarind is native to tropical Africa and grows wild throughout the Sudan. It was introduced into India long ago. It is extensively cultivated in tropical areas of the world. Sometime during the sixteenth century, it was introduced into America and today is widely grown in Mexico.
Every part of Tamarind tree is usable ie fruits, flowers, bark, it's leaves in various forms in cooking and for medicinal purposes. Tamarind mixed with other things like honey is used as digestive, for sour throat, bile and as laxatives. For more info about Tamarind , click here.

Ridge Gourd Kootu:
Kootu is any dish made with gravy along with spices, a dish commonly made in South India.
Here is my Kootu with Ridge gourd, which are like gold to me since I don't get these veggie often unless I drive to to Indian store miles away! I have already made Puliyogarai with Tamarind before. Kootu is the next best thing I can think of for Tamarind event!:))

To make the ridge Gourd bhaji:

You need:
2 medium Ridge Gourds,
1 Tomato,chopped,(optional)
1-2 tbsp Tamarind juice,
Cilantro.
salt.
To season:
1 tbsp oil+ghee,
1/2 tsp mustard seeds,
few curry leaves,
1 tbsp Chana dal,
1 medium onion, chopped,
1/2 tsp turmeric,
1 dry red chilli,
pinch of hing.

To roast lightly and powder:
3 tbsp dry coconut,
1 tbsp Coriander seeds,
1 tsp Cumin seeds,
1/2" cinnamon(Dalchini),
2-3 Kashmiri red chillies or paprika for color,
1 tsp or 10 pepper corns.
Roast all the above and powder in a grinder.
Or use 1-2 tbsp of your favorite home made masala powder.

How to:
1. Peel the outer ridges of the gourd slightly, wash and chop the gourd to small pieces. Remove the seeds if they are not tender, otherwise you can leave them as they are.
2. Heat oil in a pan, add all the seasoning ingredients one by one and fry until onion is reddish.
3. Add in the gourd pieces, stir fry for 2 minutes and add 1-2 cups of water, tomato, tamarind and cook until gourd is soft and cooked.
4. Add in the masala powder, mix well and simmer. Add Cilantro and turn off the heat.
5. Serve with Chapatis. Tastes better the next day!

Delicious for lunch or dinner:

Wasn't that yummy? :)
**********************************************************************************************************************

Finally, here is an event with "Chicken" as a choice!! YAY!! Vandana Rajesh of "cooking up something nice" blog has started one this month. She asks us to cook any chicken dish we like. Here is mine which often make on some Sundays for lunch, "Chicken masala with Turmeric rice". Thanks for hosting Vandana, enjoy your first event!:)

Chicken Masala with fresh Turmeric rice:
This is my favorite and the easiest chicken gravy I make at home when I don't have time for all the fancy masalas. What do I do to make the thali fanciful? I cook rice with some salt and fresh turmeric pieces to make it colorful!:D

Here is how I make it:

You need:
2 boneless and skinless chicken breasts and 2 Chicken thighs cut into bite sized cubes, salt, 1/8 tsp turmeric, Cilantro, 1 tbsp Tamarind juice.
For the gravy: 2 onions, sliced thin, 1" Ginger grated, 1/2 cup Tomato sauce, 1 tsp chilli pd, 1 tbsp Coriander seeds powder, 1 tsp garam masala.
Season: 1 tbsp oil, 2 tsp ghee, 1 tsp Cumin seeds, few curry leaves.
1 1/2 cup water or chicken sock.

To make it:
1. Heat oil+ghee is a pan, add all the seasoning ingredients, fry for a minute.
2. Add Onions, fry until they are slightly golden on the edges, add ginger. Stir for a minute and pour in the tomato sauce. Fry until oil shows on th sides.
3. Add in the chicken, stir until they are white on the outside. Add all the dry masala ingredients except Garam masala now, mix well.
4 Pour in tamarind, salt, 1 1/2 cups water or chicken stock. (Cut down the salt as it already has salt in the stock). Cover and cook on medium heat for 10mins.
5. Uncover and cook until you see the oil glisten on top. Add garam masala and cilantro, mix well and take off the heat. Serve with turmeric rice and a salad or potato crisps.
Chicken Masala tastes better if you leave the gravy overnight in the fridge.

Fresh Turmeric rice:
1. Add 2 cups of extra long grain rice, 3 1/2 cups water, few pieces of crushed fresh Turmeric or 1/4 good quality Turmeric pd, 1/2 tsp salt and 1 tsp ghee or butter. Give it a stir.
2. Cook in the Microwave for 13 mins on high, uncovered. After 13 mins, cover with a plate and cook for 6mons at 50%.
3. Take it out and fluff the rice with flat spatula, take out all the cooked turmeric pieces out, cover again until you need it. You can sprinkle some water on the rice and reheat in the MW for 2-3 mins on high to serve.

Note: I have given you how I make rice at home. Every MW and rice is different, so use your judgment for how much water to add and how long to cook.
Enjoy!:)

(There will be posts coming out of my ears this month here at Aroma, watch out for those! Once I am done posting for most events, I will be off for a month from July, will try and catch up with events until then! :D)

May 30, 2008

DABELI, Dabeli Masala and a Comix!

Dabeli and Dabeli Masala are my entries to MBP, which is guest hosted by Supriya of "Monsoon spice" this month with a theme of "Street Food".
Coffee of "The Spice Cafe"
blog is the founder and creator of "Monthly blog patroling". Idea of this event is to patrol the blogs for dishes which suits the monthly theme and cook from other blogs to appreciate their recipes. Thanks Supriya and Coffee, enjoy the Dabelis!:)


Chaat or Street food:
As much as we enjoy and appreciate our traditional Indian homecooked food, Indians are also great lovers of Street carts filled with great crunchy munchies which spring up every corner of the cities as soon as Sun goes down or even before or permanently settled in little shacks by the roadside all day and any day.
My favorite "food group" is always been Chaat or "lip smacking tangy, spicy street cart food" as it exactly means. So far, I have recreated most of the Street cart foods at home although I have blogged very few. This time I wanted to make a chaat I haven't tasted before and choose one from a blog I haven't cooked from so far!
Dabeli is one chaat I have not tasted either on the street or at home since I always thought it probably taste like Pav Bhaji which I make at home often, so why bother making the same, until the magic of MBP stepped in and left me no choice but to try. Boy, did I get lucky or what! :D
I know many of you have blogged Dabeli, I chose to make Rricha Nimisha's Dabeli version and made Dabeli Masala from Trupti's blog. It tasted like Heaven, will be making more soon using proper Pavs or rolls as it should be made but this middle Eastern bread I used was great for making Dabeli too! :)


Dabeli Masala:

Click on the links to see both the original recipes and their photos. Enjoy!

I chose to make Dabeli Masala from Trupti of "Recipecenterforall" blog since Rricha's recipe for Dabeli didn't use any. I didn't want to make too much of Dabeli masala at first because I thought it might taste just like Pav Bhaji masala which I already have but NO!
This masala is totally different from Pav Bhaji masala and was fragrant, easy and very tasty and very different added to Dabeli Potato masala!
Thank you for posting this wonderful recipe Trupti. I will be making more of this next time! :)

Dabeli:
I chose Dabeli (spicy crunchy masala stuffed and pressed together inside the bread rolls or Pavs) recipe from Rricha Nimish's blog. You can see her Dabelis with Pav here.
I didn't have the regular dinner roll or Pav to make this but I did bake some Middle eastern/Lebanese bread called "Khoubiz" last weekend, similar to Italian Focaccia, used it to make Dabeli toasted thick wedges sliced across. Dabeli tasted divine with this bread too!:)


To make Dabeli, you need to get all these together too:
I used to readymade bottled Mint and cilantro chutney and tangy Tamarind sauce or Delhi Chaat sauce, salted and peppered Beer peanuts, Sev or Bhujia, chopped sweet onions or red onion, Potato masala mashed with Dabeli masala, chopped green onions and Cilantro with a slice of Lemon. Some Pomegranate seeds too as the original recipe says. Traditionally, Dabelis are stuffed in Pavs or square bread rolls.

Ready for you! Help yourself!!:)

Enjoy!!

*****************************************************************************************************************************
Here is a fun event if you are looking for some laughs!!
Lakshmi G of "Taste Of Mysore" has come up with theme of "creating a comic strip" which involves Brinjal/Eggplants this month. Idea is to create a comic using a Comix or any other similar website and post it in your blogs. She will do the round up which will be hilarious to read! Thanks LG, have fun and can't wait to see the round up!:))

Well..Brinjal? What a great theme I thought, my favorite veggie! I didn't know where to go for making comic strip but LG immediately linked the site and also e mailed me all the info for making one, which set me rolling.
Although my kids don't mind eating Eggplant dishes once in a while since I don't get to buy Indian Brinjals in other seasons unless of course I drive 20+ miles to a Indian store to get them. I LOVE Brinjals though, could eat Eggplant dishes almost everyday!:)
Every Summer, I make sure to plant a few without a fail and by August, we will be harvesting loads of Eggplants and cook almost 3 days a week since Eggplants don't freeze well. That's when my kids' gets very antsy and want to get rid of all the Brinjal plants as soon as possible. When we clean up our veggie patch in the Fall, they really do a happy dance!! Hahaha!!

Saga of Eggplant:
These comic strips are not transferable from the website to blogs or anywhere except to any e mail addresses. I had to take a photo of my laptop screen to post here! :P
You can see the "comix"strip I created more clearly
here.

Here is how it goes at dinner time around 6.30pm during the Eggplant bounty season! :D

Mom (that's me, yelling from the kitchen): Hey kids, dinner's is ready!! Come downstairs, NOW!!!

T girl: OH MAN!!! Sigh...!!!

T Boy: (iPod in his ears, can't hear a thing but follows his sister downstairs like a lamb or a kid (baby Goat!:D))

T Girl: What's for dinner mom? Hope it's Spaghetti and meatballs!!

T Boy: (Got his fingers crossed, iPod is out of his ears, curious to know!)

Mom cautiously says: Eggplant Ennegayi, Rice rotti and raita!! Homegrown Eggplants too!

T and T: (together, alarmed and frustrated) KILL THE EGGPLANTS!! KILL! KILL!! KILL!!! (cursing Under their breath...&#@&#@)

MOM: (secretly delighted and laughing to herself but not showing it outside) HeeHeeHee! Hahahaha!

Latest news:
This year's Eggplants are growing very well in my veggie patch right now to my joy and to kids' frustration!!Son wanted to burn the little plants already!!! ;D

Have a great weekend, see you all next week!:)

(Psst! A very special surprise is planned for Trisha at her high school today at 10am in the auditorium and it's a well kept secret betn parents, Principal and staff! I will be there today and will tell you all about it next week! I will catch up with all of you in the afternoon when I come back home!)
I am back and catching up now!!:))

May 23, 2008

Gobi AlooTamatar Masala, Mufuletta Sandwich with Olive salad!

I will be linking my Gobi Aloo Tamatar Masala to "fortune Cooking" event going at Nithu and Shriya's "Spicy Tasty" blog. We are supposed to choose one Zodiac sign and cook with veggies it's compatible with. I chose "Cancer sign with Cauliflower" for this, enjoy hosting girls!:)

Sangeeth from "Art of cooking Indian food"
blog has launched a new event called "Eat Healthy..Fiber Rich", and asks us to cook something fiber rich this month. Here is my Gobi AlooTamatar masala full of fiber and Zodiac friendly too, enjoy hosting Sangeeth!:)

Celebrating the Zodiac sign (Cancer) of our Bichon Frisé , A.J.!! :D
Bichon Frisé , in French literally means a "curly lap dog". Our pet AJ (short for Arvind Junior!:D) is a mix of Bichon Frise and a Poodle but he does have 98% Bichon characteristics in him than a Poodle! His birthday is in June and he will be 10years old this month, 70yrs old in dog years!:D Small dogs of his size live about 12 0r 13yrs. So I thought why not give him some attention in my blog too. He loves to snuggle on that Bean bag every night! Happy birthday old man! :D
NO! He won't eat this Gobi masala, gets his own Salmon and brown rice canned doggie food, which is his favorite dish! His food sounds better than our's, don't you think? Hahaha!!
More info about this breed of dogs are here and here.

Fiber rich Cauliflower:
This is what Whole foods website says about Cauliflower,
"Filling, high in fiber, and low in calories, Cauliflower is a great food for reducing your waistline, says Dr. Barry Sears in his book The Top 100 Zone Foods. Weighing in at only 25 calories, a cup of florets contains 100% of the recommended daily allowance (RDA) for vitamin C, one-third of the RDA for folate, and a nice serving of potassium and vitamin B6. These nutrients all work to protect your heart. Cauliflower also contains bioflavonoids, indoles, and other chemicals that protect against cancer. To retain the flavor of cauliflower and minimize nutrient loss, cook it rapidly by boiling or steaming. Overcooking cauliflower diminishes the nutrients significantly."
Food writer Mark Bittman quoted a Cornell University study, stating that 100 grams of cauliflower had 55 mg of vitamin C after boiling, 70 after steaming, and 82 after being cooked in the microwave oven.
For more info about the benefits of fiber, check out here.

Fiber contents of Aloo-Gobi-Tamatar:
1 medium baked potato with skin has 3.8 gms of fiber and 1 cup of Cauliflower has 3.35 gms of fiber, 1 small onion has 1gm of fiber and 1 Tomato has 1.4gms of fiber!

Gobi Aloo Tamatar masala:
The title literally means Cauliflower, Potato, Tomato in spices, you can make this with or without sauce. You can add any veggies like green peas and cooked beans to this recipe. Just make sure that you don't cook the veggies to death which leaves the dish without any nutrition! :)

To make it, you need:
1 small head of Cauliflower, 1 large red Potato peeled or leave the skin for more fiber and cubed, 1 large Tomato chopped 1/4 cup Tomato sauce, 1/4 tsp turmeric, cilantro.
Season: 1 tbsp oil, 1/2 tsp Cumin seeds, 1 small onion finely chopped, 1" ginger grated or ground.
Dry spices: 1 tbsp Coriander seeds powder, 1/2 tsp or more Chilli pd, 1/2 tsp Garam masala, add 1/4 tsp Cardamom powder and 1/4 tsp Fennel seeds pd at the end for that special fragrant touch!


To make the masala:

1. Cut the flowerettes and bake them on a sheet in a single layer at 450F oven for 20 mins or spray some oil on top and Microwave them for 3-5mins or until you see reddish spots on top.
2. Heat oil in a non-stick pan, add Cumin seeds, chopped onion and fry until reddish. Add ginger, stir and then cubed Potato, a tbsp of water, cover and cook for 2 minutes. If potato is cooked before in the MW, it's even easier!
3. Put in all the dry spices like turmeric, Tomato sauce or Tomato pieces. Cook for 1 minute or until oil shows.
4. Now add all the almost cooked Cauliflower, salt, add about 2tbsp or more water, stir fry until almost dry, unless you want some sauce. In that case, add more water or veg stock to it.
5. Garnish with cilantro and lime juice.


Serve with whole wheat rotis for even more fiber kick or serve on a bed of cooked Quinoa, you will be in nutrition Heaven! :D

Another look!


Have a great weekend, see you all next week!

Last minute addition about Fiber:

I found a great article about the benefits of Fiber at this diet website. Take a look, it's a lot of info! Good to know all these too! :)

*****************************************************************************************************
Anupama of "Food and More" is hosting a Sandwich Festival 2008! this month. Last time I somehow missed the deadline for her event and this time I almost did it again until I saw sandwiches flying in every blog this week. I am sending my delicious Muffuletta to her, thanks for hosting Anupama! :)


What's a Sandwich and why we we call it so?
A sandwich, essentially is a "grab and go" food made of two or more slices of bread with one or more layers of filling such as meat, cheese, vegetables, salads or ever popular peanut butter and jelly!

WIKI says, ""The first recorded sandwich was by the famous rabbi, Hillel the Elder, who lived during the 1st century B.C. He started the Passover custom of sandwiching a mixture of chopped nuts, apples, spices, and wine between two matzohs to eat with bitter herbs."

"In 1765, John Montague's biographer, N. A. M. Rodger, points out in his book, The Insatiable Earl - A Life of John Montagu, 4th Earl of Sandwich, that the sole source for giving Montague credit for the invention of the sandwich, was gossip mentioned in a travel book by Grosley, and that at the period in question 1765, he was known to be very busy, and it is just as likely that it was for the purpose of eating at his desk."

"In 1840, the sandwich was introduced to America by Englishwoman Elizabeth Leslie, (1787-1858). In her cookbook, Directions for Cookery, she has a recipe for ham sandwiches that she suggested as a main dish!"

New Orleans style Muffuletta sandwich with Olive salad:


Here are the recipes I have already posted at Foodie's Hope few weeks ago and reposted here for "Sandwich Festival 2008!" Hope you try it! :)

Whole wheat bread and Muffuletta with Olive salad!

Enjoy and have a 3 day long safe, peaceful weekend!:)